

If you’re looking how to add social sharing buttons in WordPress post then you’ll find some magnificent number of plugins here.
Adding social sharing button to your website may help you in gaining social traffic. There are a number of plugins available (FREE+PREMIUM) both, you can just start with some FREE plugins and later on switch to PAID plugins.
Best ways to add social sharing buttons in WordPress:
- Orbit Fox Companion
- Social Snap Lite
- Jetpack by WordPress
Add social sharing buttons in WordPress with these plugins:
1. Orbit Fox Companion:

The FREE plugin from themeisle.com lays out many different features along with the social sharing button and website design template.
With Orbit Fox, you can choose and add 20 different social buttons to your website. Also, you can decide the positioning of the button along with turning on and off depending on different devices like mobile or website.
Installing Orbit Fox Plugin:
Step 1: Click on Plugin -> Add New and Search For Orbit Fox or visit here.

Step 2: Click on Install and then Activate
Step 3: Now, navigate to Orbit Fox -> General Settings

Step 4: Switch ON the Sharing Toggle inside general settings

Step 5: Now go to the bottom of the setting and you’ll find the Social Sharing Module. You can easily configure all your setting from here.

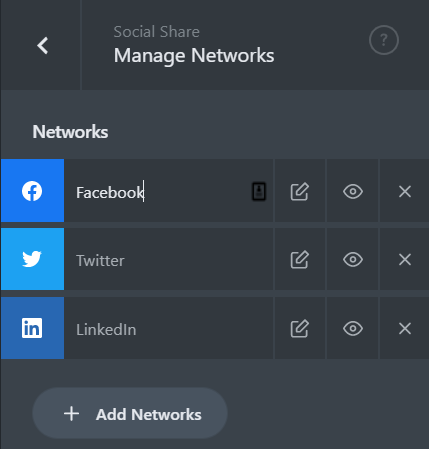
2. Social Snap Lite – Social Share Buttons:

This is another FREE plugin available to add social sharing buttons in WordPress website. Social Snap Lite is customizable and supports few networks including:
Also, it comes with a premium version which includes 30+ share networks, share counters, URL shortening, custom share images and descriptions and more awesome features.
With Social Snap Lite, you can easily add social sharing buttons to the bottom, start or floating sharing buttons to the blog post.
Installing Social Snap Lite:
Step 1: Click on Plugin -> Add New and Search For Social Snap Lite or visit here.
Step 2: Click on Install and then Activate

Step 3: Then select Social Snap -> Social Sharing -> Manage Networks
Step 4: Next, you can choose whether you would like to add share buttons inline content or floating sidebar.

3. Jetpack:

Jetpack is a very popular WordPress plugin and if you’re running your WordPress blog then you’re definitely using this.
Also, Jetpack provides a bunch of different features including security, performance, traffic analysis and much more.
Installing Jetpack Plugin:
Step 1: Click on Plugin -> Add New and Search For Jetpack or visit here.
Step 2: Click on Install and then Activate
Step 3: Next you’ll be asked to connect with wordpress.com. Therefore, log in with your account or register with wordpress.com
Step 4: Now, go to Jetpack setting and navigate to the Sharing tab.

Step 5: Switch ON the social share toggle.
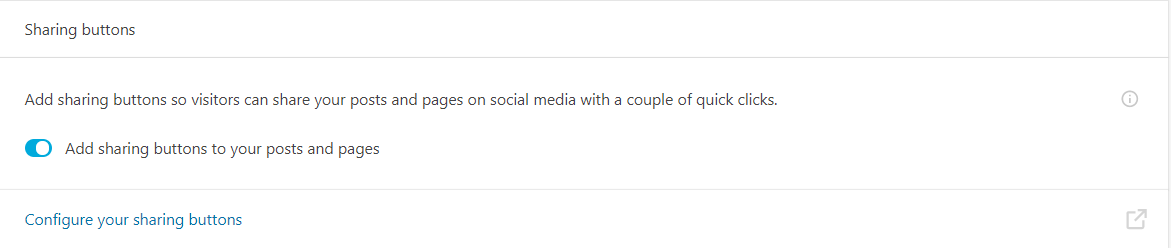
Step 6: Now, configure the buttons. Navigate to Setting-> Sharing

Step 7: Drag the sharing buttons under Enabled Services.

Final Thoughts:
First of all, it’s totally your choice which one to use for adding social sharing buttons in WordPress website.
Also, all the three plugins are FREE and you can try them all one by one and choose which one is best for you. Below are some points you should consider before choosing any of the above plugins.
- Easy Customization of Plugins.
- The positioning of Plugins.
- Styling of the buttons- Whether they fit your website interface or not.
- No of Social Sharing Sites available.
- Desktop and Mobile Friendly
I hope you’ve understood how to add social sharing buttons in WordPress.
Don’t forget to share this content and let me know your thought inside the comment box.
Recommended Read:
- How To Write A Blog Post – 15+ Tips & Tools
- The Ultimate Guide To Google Search Console in 2020
- 10 Best Domain Name Generator Tools
Very useful information…